February 28, 2011

Eco Dyed and CWQ Block 8

Haven't been very active here lately. My online workshop is almost at an end and I've signed up for a Shibori technique workshop with Glennis and a cloth whispering for mini hearts with Jude again in April. Then in May is my Silk Study Tour to Japan. I'm so looking forward to it. Through my online network I discovered that an annual Shibori festival is on in Arimatsu, Nagoya Prefecture while we are there. My friend and I will visit that too. How very exciting! 
I have been doing some eco dyeing in the last couple of weeks with eucalyptus barks. The eucalyptus trees are shedding their bark in Spring. I collected some on my daily walks. To my surprise the bark produces a beautiful deep tan colour. Actually I have a dye pot going most days with various stuff. 


These are the 2 pieces of vintage silk dyed with eucalyptus bark. The piece on the right I scrunched into a ball and tied with rubber bands. The one on the left was pleated and folded into a neat bundle, then tied with rubber bands. I boiled the bark for about an hour and dropped the silk bundle into the pot and boiled it for another 45 mins. I left the bundles in the pot outdoors until they completely dried before I untied and rinsed the excess dye off. 


To my surprise there was not any excess from the dye at all. The water ran clear. So this is a successful batch of dye and I will gather more bark next time I walk that way. I have been keeping a chart for all the dye I'm doing now. My daughter-in-law insisted I keep a dye chart for the future use. Good idea.


And here where the barks came from. The tree is bare after shredding all of it barks. The tree trunk is still have fresh pinkish bark on it. Such a treasure find! 


Finished block 8 Cotton Boll of the Civil War Quilts block of the week last night. This block went together very well. I love that my 'F' fabric fitted in the block perfectly again. It's really surprised me how well any colour goes with the 'F' fabric. If you want to see more of the finished blocks visit flickr page for the CWQ 2011

Hope everyone is well and keeping busy with your creations. I hope to have a chance to visit all your blogs soon.


February 20, 2011

Civil War Quilts: Block 3 & 7

At long last I have finally finished block three, the Seven Sisters of Civil War Quilts block of the week. It took me that long and I had to challenge myself to do one star per night. I'm happy I finished it now. I'm now up to date with all the blocks. Block seven came out last weekend and it was an easy log-cabin block so I finished it on the same day. If you have not visited the Civil War Quilts blog I hope you will do so soon. There is a Flickr page set up for the finished blocks from the members. It's a treat to see all of the blocks made for each week displayed together. 

(Block 3 Seven Sisters)

Block 3 has only 7 seven stars, so it wasn't hard to choose where 'F' fabric would go. I have had the background fabric for ages. Even though it was quite a simple block, it has too many points to needle turn. I'm out of practice with appliqué I think. I do love it now it's done!

(Block 7 Log-Cabin)

I wanted to use yellow in some of the blocks, and block 7 gave me a chance to do just that. The original block has only 2 logs; 3 including the center piece. My version has 3 logs, 4 with the center piece. My 'F' fabric is used for the center piece which was the obvious choice. 

Apart from these Civil War Quilts block I haven't been working on any traditional quilts lately. I'm in the middle of my Contemporary Woven Boro workshop with Jude Hill. It's another kind of quilting altogether. I don't have to worry about the dreaded 1/4" which I'm not very good as keeping.  Also I don't have to use only quilting fabric for this kind of quilting. 

In this decade I've promised myself to use up my fabric stash and recycle and reuse as much as possible.  It's my way of helping the environment. I'm sure you have your way of helping the environment too.  Thanks for visiting. I do appreciate all your kind comments. 


February 17, 2011

BORO Ball Tutorial Takes I

After I posted about BORO ball here. Hermila (no blog) from my online workshop asked me if I have a tutorial on how to cover Styrofoam balls.  I don't have instructions for them. Even though I made hundreds of them for school fates many years ago. I mainly made them in Christmas colours then. So here goes my version of the tutorial. It was fun thinking of step by step instructions and taking some photos for each step. Of course if you don't understand anything just leave your questions in your comments. 


Styrofoam balls come in many sizes, but today I will use the 3" diameter ball. It's an easy size to work with. You will need a few pieces of your scrap fabric. I'm using six different pieces of vintage BORO fabric here. You will need a Stanley knife, pen and ruler.


On every Styrofoam ball there will be a line around it. It's a manufacturers line. From that line use the pen and draw over it as you can see above.


You can divide the ball into six or eight segments. Today I will only do six because I want to use the indigo moon fabric I dyed as one of the segments. Divide the ball into six sections by eyeballing it. It's okay if you make mistakes, just start practicing until you get it.  The ball will be covered with fabric afterward. Using the knife cut along the draw lines about 1/3" deep. Be careful not to cut yourself doing this.


This is the template for the fabric. Using the template cut one piece from each piece of your fabric. You can use three pieces of fabric and alternate them, but I'm using six today. The template is about 1/4" bigger than the segment all around. 


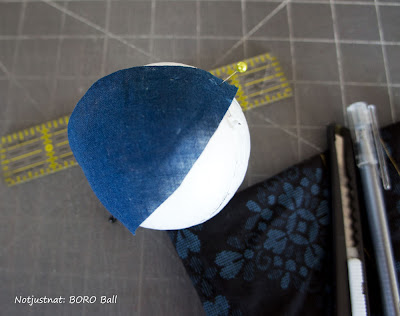
Place the first piece of fabric over the section. Pin on the top and bottom of the ball. Using the back of the knife push the fabric into the slit you made on the ball. Start a little section at the time. You would be surprised how easy it is. 


The first section is now covered. Do the same to the rest of the segments. You can be creative with the placing of the fabric. 


All the six sections are now covered. Not too hard right. 


Using any braid or cord to cover the joints. I used handmade cord to match the fabric. You will need about 1/2 meter of cord to go around the ball. To start off with, pin the end of the cord and just follow the lines. You might need another pin at the bottom of the ball to keep the cord in place. 


You can use the left over cord to make a hanging for the ball. You can see that there is no sewing, no glue and no mess. For decoration you can go back and add more fabric or stitches on top. See below. 


This ball was done with eight segments. I added another diagonal piece over the plain fabric. You can try more contrasting colour or use ribbon. 

I hope to see some of these balls pop on your blogs in the near future. 


February 12, 2011

Happy Valentines the BORO Style

For the first time in ages I can say I'm back to the land of living without the nasty flu again. A couple of visits to the doctor and sometime to rest and I would say I'm well again yay! Today I'd like to start on a brighter note to wish you lovely bloggers and friends out there a Happy Valentines Day for Monday! I would like to share LOVE all around this Valentines Day with my readers. Blogging has been fun for me and after 2 years I can happily say I have met and made many wonderful friends through blogging. I'm loving it!
At part of my Contemporary Weaving BORO online workshop with Jude Hill. We were weaving hearts in one form or another, and this is mine to share.


This is my Red Heart I did using scraps silk, satin, velvet and vintage silk for the background. The stitching give such a nice texture to the piece. I must say it took me 20 years of quilting to feel totally comfortable using raw edges. I'm glad to say that I have two quilting lives. One for the traditional and one for contemporary. I'm happy working on both concepts. BORO cloths are totally hand stitched.


Silk Study Tour piece. The best part of my travel always includes projects I take along to work on. We used to be away 6 weeks at a time and in some of those trips I appliquéd enough for a quilt. Sometimes I just take fabric and embroidery threads and do whatever idea I have while travelling. In my next trip with the Silk Study Tour I have prepared a basic SST cloth to take with me. I have already put the moon on there. The moon reminds me of Glennis (Shibori Girl). I will add Sakura (cherry blossom) flowers somewhere on there too. I'm not sure the trees will still be in bloom when we get there. At least I have them here on my cloth!


Another BORO woven piece I did for the class assignment. It was weaving without foundation. I don't have the right frame to use for this assignment, so I used a shoe box as a loom. I called this piece 'Namaste' to remind me of Kathmandu, Nepal where the silk tie came from.

I un-stitched it to open up the tie, and made slits in the large part of the tie. I didn't cut it right through; only as much as I needed. I then used mixed scraps of silk to weave with. I then appliquéd with a Buddha figure I cut out from a scarf and stitched all over it. After that I folded the tie back in shape again. Some people in class suggested I use it as a scarf. It's a lovely, soft piece. The stitching gives it a lovely texture. The stitching on the BORO pieces completes the work. 

I have posted these on the class blog this past week so some of you from there would have seen them already. 

Have a good weekend all where ever you are. 


February 6, 2011

A Moment of Weakness

In early January I was concerned that I might not have anything to do, ha! In a moment of weakness I joined the Civil War Quilts block of the week. This year is the 150th  anniversary of the American Civil War. Barbara Brackman a quilt historian, and author of Civil War quilts books and a fabric designer kindly offered a free weekly pattern to commemorate this event. At one block a week I thought I could manage that. It was more than just the great traditional patterns that Barbara offered to us; each block has a history to go with it. Block 6 just came out this weekend, so you are never too late to start. All the patterns would always be on the blog. You can catch up at any time. Apart from that there is a CWQ Flickr group for those without blogs to put up their photos. They are surprisingly enjoyable blocks to make. I don't have all the CW repro fabric to make them with. For me it's a challenge to use whatever I have on hand for these blocks. 

(Block 1 Catch me if you can)
I'm so excited to use the red Liberty fabric I found in an op-shop to use as 'F' (feature) fabric. I will have enough for all the blocks when I add other fabrics into it. It's not like other typical Liberty prints that I have seen before, but it definitely has LIBERTY Exclusive Design on the salvage! 

  
(Block 2 North Star)
It's a challenge to see where I can place my 'F' fabric on the pattern. I'm happy with what I have done so far; what do you think? 

(Block 4 Tears for Texas Tears)
I must say I didn't enjoy piecing this block. I had to unpick it a couple of times to get it right. Right no not right, it's a little bigger than 8.5" finished, but I will worry about that when I put them together in a year. I could use it alone as a label! Again the 'F' fabric finds its home nicely in this block too. 

(Block 5 Kansas Troubles)
I was surprised how well this block went together. I actually enjoy piecing smaller blocks. Again the 'F' fabric found its place nicely in this block too.

 (Block 6 Richmond)

Block 6-Richmond only came out last night so I thought I would get it done for this post. When I checked Flickr this morning there were already many completed blocks posted. A lot of very keen quilters out there were ready to get started when the pattern came out. I like the 'F' fabric on this block. I placed it on the outside border instead of inner pieces. It's important for when it comes to joining the blocks to have the balance of light and dark blocks.

Did you notice no block 3 here? Yes block 3 is an applique block and I just started when I was called away on duty as a Grandmother (any excuse, right?), but I'm working on it now, only 2 more stars to applique.  

Hopefully some of you might like to join the fun to make this historical quilt with me. Only one block a week, COME-ON!!! 


February 2, 2011

Where was I?

For nearly two weeks I was away to help out when DGS was born. I was glad I went. I got to see him on the first day home, and I got to take care of DGD for a little while just us two. DGS was settled well into his routine. Let's just say I had good sleep at nights, but I couldn't say the same for his parents! 

I came home in the weekend, but I must have caught the flu somewhere on my travels. I'm now sick and house bound for the rest of the week per doctor's orders. 


While I was away, I started a couple of projects. You might remember I mentioned that I'm taking Jude's online workshop. The workshop started while I was away and even though I had access to the internet, I didn't have time to follow it. Jude mentioned that I could make a baby cloth and that is what I did and finished it as well. DIL said she would preferred it rather than a proper quilt which takes more storage. I think so too!


Here is the Baby Cloth I did, I used boro and weaving style quilting. All the materials were boro and re-purposed fabric. The quilt is all hand pieced and hand stitched. I can go on stitching this quilt forever. You might think that it doesn't look like a quilt for a baby boy! Baby grows up fast these days. I feel that DGS can take this quilt and hang it on a college dormitory wall  anywhere in the world!


Another project I worked on was this long neglected netting bag I started when I was more into basket weaving years ago. The technique is not weaving but it's a net, like fishing net. The first couple of inches on the top was made using cordyline leaf striped thinly and twined into string.  


When I finally found it again for the life of me I couldn't face doing that again. It was a lot of twining! In one of the Fibre Forum events I found a ready made twine to use for the rest of the bag. You can't tell the difference right? I thought I didn't have time in this life to make everything! Bought items are sometimes useful, don't you agree?


The original design had changed by this time. I couldn't remember what I was making then, just one of those things you like to learn how to do. With the boro fabric in my thoughts I thought I will Boro it. By the way, Boro means rag in Japanese. How cool, I can use the word Boro as a noun too.  I really like this bag. It's an original design by me. It has a long handle to go across my shoulders while I'm traveling. Did I mention that I booked the Silk Study Tour to Japan in May? 


I'm sure some of you play with these styrofoam balls at one time or other. I picked up a bag full of them at an op-shop while I was away.  DIL was trying to get some new ideas for the handmade market she and her friends sell at. So I made a couple to show her and gave one to DGD using owl fabric (forgot to take a photo of that one). 

Thanks to all well wishers when I posted about the arrival of DGS. Sorry I didn't get back to any of you. It's good to be back visiting blogs again. My life must have been very empty before I blogged. 

Please join me to wish everyone in north Queensland a safe 24 hours as they are about to be faced with yet another disaster -  a Category 5 cyclone yasi due to come ashore tonight. They are very well prepared according to what I saw in the news. Let's hope all are safe. 


Related Posts Plugin for WordPress, Blogger...