May 30, 2010

Kit visit and Japanese Fabric

It has been a busy week since I last posted on here. It was nice touring the Blogger's Quilt Festival. I'm glad to be part of it again for the third time. If you have not seen it, please see my previous post for more detail or click the above link.

I haven't finished anything in the last couple of weeks so I thought I will show you my Japanese fabric I brought back from Japan. I have a lot more photos from Japan to sort through and show to you.

Our daughter Kit visited this weekend from Sydney. After graduating from ANU, Kit moved to work in Sydney. We see each other quite often; either we go there or she comes to us. Kit is leaving for New York in 2 weeks time so it's nice to see her before she leaves. Kit has been to New York a few times in the past. She loves New York and has many friends to visit there.   
This is  Kit and I on an outing to our favorite spot for lunch and coffee at Oakleigh in Melbourne.   
Japanese shop keeper and I in Nara, Japan. A train ride from Kyoto to Nara took only 40 minutes. Nara is Japan's first capital. In the old quarter Naramachi District, the buildings are distinguished by narrow frontages and surprising depth. The lane started off with traditional Japanese shops including the fabric shop above. I purchased a lot of Japanese fabric from there.
These coin purses seemed to drive Japan's economy. Every shop would have them including one that sells only these purses in all shapes and sizes. I bought a few ready made as well as some clasps to try and make them myself. 
The bundles of fabric above came from Osaka. I wondered into a shop of upholstery supplies full of items such as cushions, table mates, napkins,  and Nolans (Japanese door blind). In that shop I found a few baskets full of these bundles. I asked with my broken Japanese how much they were. The lady told me they are not for sale and tried to sell me fabric by the metre. I then used the magic word "Patchwork", oh it was a magic, she understood and agreed to sell these to me for only $3.00 per bundle. It was a good buy! 
Here is my Japanese fabric from Nara. I was only looking for traditional Japanese fabric and not a big amount. I didn't have anything planned to make with them, but I'm happy with what I brought back.
Some fabric from Tokyo
And more
These cute kitten prints were so nice I have to have some! 
I bought some offcuts and vintage Kimono pieces too. I am glad to be using them in my online workshop Cloth to Cloth. 

My online workshop Cloth to Cloth started over a week ago. I'm really enjoying it. I wish I could show you all the work from everyone, but unfortunately the blog we are posting our work on is a private one. I will post my work on here to show you what I have been doing. 

May 22, 2010

Blogger's Quilt Festival 2010: Mystery Baskets

It's hard to believe that this is my third Blogger's Quilt Festival. Amy you are a darling to bring us bloggers together through the BQF so thank you.

There is a story behind every quilt, but this quilt has more than a story, there is a mystery about this quilt. Let me tell you about it. All through Australia there are opportunity (thrift stores for you in the US) shops called 'Salvos', short for Salvation Army. There are remnant fabrics in all the branches of the Salvos and I have found some great fabric from them. This is my way of recycling. On one of these visits I found the quilt top amongst the remnants. It had a $1.00 tag on it. I picked it up and had a good look. It was well pieced and well appliqued. I put it back because I did not want another UFO! I walked away thinking why did someone give away a perfectly good quilt top! I walked past it again and thought, I 'm a quilter and I have a responsibility to rescue this top and finish it. So that what I did!

The top was completed with only one basket left without applique on it. I appliquĂ©d the rest of the flowers and added the inner and outer border with the corner stones to complete the quilt. I already have fabric in my stash that goes quite well with the top. Whoever made this top had done a lovely job even using the reverse side of the fabric for the four triangles. I then reversed the fabric for the corner stone in keeping with what was there already. I sent it off to Donna Ward to machine quilt it for me.

I should have taken a photo of it when I got it, but this happened before I started blogging so I didn't think to do that. This is how I found the top less a few flowers.

Wouldn't it be great if I could find out who made this quilt? In the meantime it remains a mystery quilt for me and that is why, I named it Mystery Baskets. Even though I didn't start this quilt, by completing it I feel that this is how it was meant to be.

May 19, 2010

Fabric Weaving: Cloth to Cloth

I'm taking part in an online workshop Cloth to Cloth by Jude Hill. The workshop began on May the 15th. The class started of with an introduction lesson and video. It was very informative, flexible and fun. Everyone else is well on their way to create unique piece of art quilts. I'm slow on the uptake due to time constraints, but finally last night I started mine. I was in Japan in March and April this year and we had a great time. I brought back some Japanese fabric including vintage Kimono pieces. I decide to use them for this project.

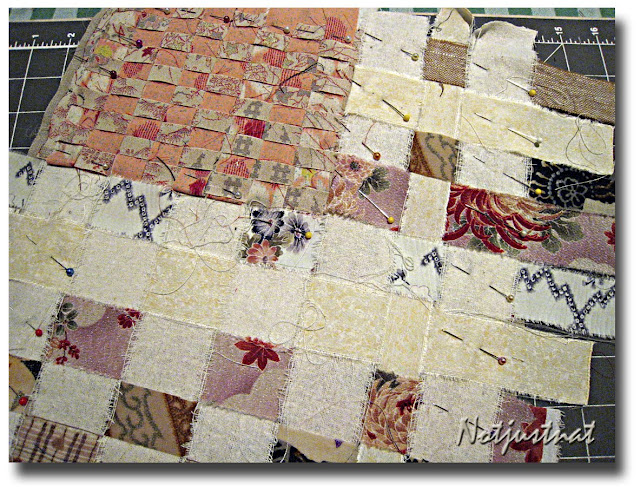
Picture # 1 - This first piece above is made of pieces roughly cut or torn into 1" wide strips. The pieces of fabric consist of cotton, silk, wool and cotton mixed. The weaving method is coming together very quickly. I used red for the background and decided to leave spaces between the pieces to show the underneath. I can't wait for the next step of stitching. You can see the loose threads everywhere. Jude said that we can cut them off as we stitch so I took her word for it.

Picture #2 - So far I only pin basted the weaving onto the background fabric. Later I will baste it to the background fabric and remove the pins. It's then ready to be stitched. I'm in no hurry to work on it yet. I would like to wait and see what will come next in the lesson. The lesson goes for 4 weeks and Jude told us that apart from stitching she will show us how to embellish the surface of the cloth later. 

Picture #3 - Weaving is not new to me. I'm also a basket weaver and I thought I will add some creative weaving into the blocks. In picture #2 I split the strips on the top corner into half and wove smaller strips to gives it a different look. In picture #3 I wove a separate section and attached the section onto the main block. I can see that this technique has endless possibilities. Watch this space for the next step - stitching!

May 16, 2010

Doll Quilt and A Little More

Woo hoo I finished (not) the Cheddar Cheese and Crackers doll quilt! I spent every evening last week piecing this beautiful and challenging CC&C doll quilt. This quilt was a quilt along project hosted by Lori of Humble Quilts. I loved it even more after I saw one hand quilted by Janet. DH was away on business trip this week, so I spent that time concentrating on piecing this quilt. It's not a hard quilt to make, but you really need to concentrate on the colour connections from block to block. I'm pleased to say that I finished piecing all the blocks without any mistakes. Putting the blocks together should be easy enough...! 

You need a designer's wall for this quilt. I don't have one so I hung a piece of flannel over my curtain rail and used that as designer's wall for this project. With superb instructions and photos from Lori it was easy enough to follow.

I took the designer's wall out on the deck this morning because I want to show you a bit of our grape vine that is in autumn colours. It's a beautiful time of the year. I love the deep orange of all the vine leaves. 

Remember the mini tumbler quilt I took with me to Japan? I started quilting a bit there, but only finished it after I got back. I didn't put a lot of quilting on, I just stitched in the ditch through the top and added a small branch around the border. I love it a lot now that it's finished. I'm planning to make a bigger one soon. Kathie is a great inspiration for me to make a bigger quilt. 

My interest in Japanese crafts started a long time ago, but it got more intense since we visited Japan in March this year. I have seen these cute thimbles displayed in fabric and Kimono shops in Japan, but not knowing Japanese I didn't know what they were until I came back and read Janet's blog about them. Janet had made a few herself and told me that I can get a starter kit from Ma Mercerie. You can see my first Japanese thimble made from the kit. It was really fun and I will make more myself from scratch, I hope. There is more information here if you are interested. 


I mustn't forget to mention about Blogger's Quilt Festival starting from May 21-28. If you are new to blogging, this is a great event to take part in, you will meet other bloggers, and make lots of friends this way. Click on the above image to visit Amy's blog  and sign up. Hope to see more of you at Blogger's Quilt Festival this year.

May 12, 2010

Cloth to Cloth online Workshop

This is a quick post to tell you about an online workshop Cloth to Cloth by Jude Hill. The workshop will begin on May 15th and it will go for 4 weeks. I have been following Spirit Cloth by Jude Hill ever since I started blogging. She is a strong influence for me to start free form stitching and I love it. I'm so delighted that Jude has started teaching an online workshop. I'm so looking forward to it.

I stitched this up when we went for a picnic at our local beach on Mother's Day. I never leave home without a bag of fabric and threads. You never know what will inspire you walking along the beach. This is supposed to be an island with waves going in different directions. Tilt your head a little to the left when you are viewing this. It should be set on point. Notice the cracked shell? It cracked when I tried to scan it. I will have to glue them together I think...!

A basket full of Japanese fabric in taupe range that I will be using for the workshop. I will also dye some threads to use for the workshop too. I think I will dye some in bronze, brown and tan.

Remember "Pieces of Japan" that I stitched throughout Japan? It's really a start of my free form stitching. I found it so relaxing to just start with a piece and then to add more pieces once the first one is done. After a little while the design elements immerse within itself. Cloth to Cloth will cover quilt weaving and free form stitching. Jude has another two workshops to follow this one and I've already put my name down for Patchwork Beasts that is due to start later on in the year. If interested, please visit Spirit Cloth - online workshops.

May 9, 2010

Happy Mother And Grandmother's Day

Happy Mother and Grandmother's Day to all my blogger friends and visitors. I'm pleased to say that this is my second Mother's Day post since I started blogging over a year ago. I feel quite sentimental each time I post something that I did a year ago. Today I would like to honor one mother in my life. My mother, a great strong lady. A bread winner in our family. My father said he was the brain of the family, he was a ship's captain and my mother was everything else. She was a hard working woman, a very smart woman. My mother was a sewer, basket weaver, a gardener, a great cook, a barber and she was also a singer. My mother was a gentle and kind woman. I can not remember my mother ever getting angry. She was a beautiful mum to us 5 and was a great grandmother to 7 grandchildren. The only regret I have is that I wish you had met my children Mum...!


This is my Mum. A copy of a black and white photo taken when she was in her 30s. 

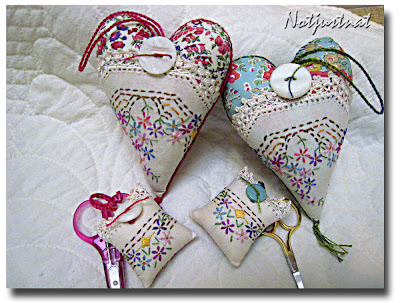
Mother's Day hearts. I made a few more hearts for this year's Mother's Day. They are made from a vintage doily  that I tea dyed. It was quite a small doily and I didn't want to lose any embroidery from it. So I added Liberty prints to the back, and this way I also saved the crochet edging. There was a little piece from the doily left over, I made fobs for my scissors. Waste not want not, that is me. 

Another photo with a vintage doily in the background. Another doily waiting to be cut up for more hearts. Maybe at Christmas time!

These hearts are made from a round doily. A doily with a folk kind of pattern on it. It was enough for four smaller hearts. I also tea dyed it before I cut it up. I quite like these ones too.

I used a check fabric for the back of these hearts. I do love making hearts and hope that I will have enough to fill my tree at Christmas. Do you like making hearts? I have a pattern of these hearts, so if you would like a copy, just leave me a comment. 

Enjoy your Mother and Grandmother's Day everyone. It's your day. 

May 5, 2010

Featherweight Challenge and a Little Extra

I am a few days late for the FWC 4th. installment. I have been quite busy since returning from our holiday in New Zealand and Japan. I have still not settled back to my routine yet. I wish I was back in Japan for a bit longer!
I completed the top before we left so the only thing to do was to add the border and while I was in Japan I found the perfect border fabric for it. I didn't go to Arimatsu, a town where Shibori originated. The traditional technique used to tie-dye fabric started 400 years ago, and is still carried on today. Instead I found the same fabric in Nippori Street, Tokyo.
I found this tie-dye fabric in Nippori Street (fabric street) in Tokyo. DH went to the electronics street and I went to fabric street. That sounds fair, right? There was a little hick-up when I got off the train where the instructions said to take the West exit, but the only two exits were North and South, ha? I decided to follow some Japanese ladies out thinking that they might be going to the fabric street too. Yes and I was right!  
After a long walk and stopping at every fabric shop along the way, I found Tomato the famous fabric store which is 8 floors high. I took the elevator to the 8th floor and came down by stairs. Phew that was a smart move walking down because I ended up with a few carry bags by the time I got to the bottom floor! 
 What do you think about the border fabric I found? It is a tie-dye fabric made in the traditional way. I spotted this piece of fabric in a vintage Kimono shop. The fabric was rolled and stored in a basket and placed underneath the hanging Kimonos. I think it jumped up at me when we saw each other...! 
A closer look at the pattern. Can you see the leaping deer? I haven't added it on the quilt yet. I'm happy with how it looks with a small strip of red for the inner border.
Here is Abela, my Featherweight Sewing machine working hard till the last stitch to get this quilt done. 
While I was piecing this quilt I was using the method Leaders & Enders from Bonnie Hunter's new book and made enough bias squares for this mini quilt. All the dark pieces are the end bits from this quilt and the light bits are from vintage kimonos. Some are silk and other are linen and cotton mixed. 
I'm very pleased to end up with a mini quilt from this challenge. I have started quilting it with Sashiko stitching on the light triangles. I'm thinking of making a second rail fence quilt using my scraps with steps setting similar to what Ria and Terry have done with their quilts.

Both Ria and Terry are in this challenge with me so don't forget to check out their blogs for the update.


May 2, 2010

Australasian Quilt Convention

Bron and I went to the Australasian Quilt Convention (AQC) today in Melbourne. I have arranged to meet up with blogger friends from the Civil War Bride Quilt blog as well. It was great to finally put names to faces. We had a lovely time looking at all the beautiful quilts and of course all the stalls with a gorgeous range of fabrics.
This is me in front of this gorgeous art quilt. Unfortunately I didn't get the name of the maker, I have to apologise. This quilt is more like a painting than a quilt. I just love it.
"Roses from the Heart" is an organisation involve in making these bonnets for each female convict in Australia. If you have convict ancestor/s and would like to make one you can get in touch with Christina Henri at http://www.christinahenri.com.au/ Christina will provide you a bonnet pattern and you can have fun making and embellishing to personalize it. I picked a copy of the pattern at the show and I will make one too.
A group of us from the Civil War Bride Quilt blog. From left is Lizzie, Deb, Nat (me), Ronnie (no blog) and Kali. Everyone brought their show and tell except me. Sorry ladies. I really enjoyed meeting them all and we were chatted like old friends. Bron took a lot of good photos for us, thanks Bron.
This was Bron's first visit to a quilt show since she became interested in quilting. Bron is planning to make a wool quilt for my DGD. You will see her quilt on Honey and Lemon soon.
I fell in love with this gorgeous quilt "Oriental Dreaming" by Chris McIndoe and Sharon Parkinson from SA. You must click to see the quilting details and the appliquĂ© panels on either side of the circle. 
The overview of the hall where the quilts are hung. By chance the quilt hanging on the right is a crazy quilt made by Ronnie, the lady on our table. I met Ronnie 5 years ago when we first moved to Melbourne. I remembered Ronnie working on this quilt and I remembered it ever since. I'm so glad to have met up with Ronnie again today. 
Bron was enjoying the sun after a long ride home on the train. We were waiting to be picked up outside the station.
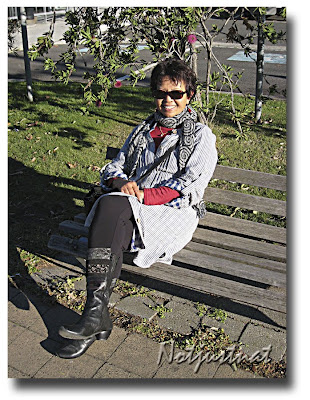
My turn to relax and to rest my tired feet. My last year's boots are still serving me well.
Ronnie has finished her Civil War Bride quilt and brought it in to show us. She is in the process of quilting it. We were inspecting the fringes on the table block.
I'm so glad to see this quilt, Stars and Sprigs by Kim McLean in person. I first saw Janet working on it on her blog recently, and I fell in love with it again this time. It's such a beautiful quilt. I hope the pattern will be come available soon. 

We had a really good day today. Hope you enjoy seeing my photos.


Related Posts Plugin for WordPress, Blogger...